Pre-Engineered Buildings
Steel Building Design Explained: How Pre-Engineered Buildings Are Engineered
A clear guide to pre-engineered steel building design — primary and secondary framing, frame types, bracing, design loads, dimensions, and the engineering workflow behind a PEMB.
What "pre-engineered" actually means
A pre-engineered metal building (PEMB) is a steel-framed structure whose components are designed with CAD/CAM engineering, fabricated in a factory, and shipped to site as a numbered, ready-to-assemble system. Every piece arrives pre-cut and pre-punched for bolt-up assembly, so there's no cutting, welding, or fabrication in the field.
The important idea in the word pre-engineered is that the structure and its enclosure are designed together as one coordinated metal building system (MBS), where each component is engineered to support the others. The finished building behaves as a single unit rather than a collection of independent parts. That system-level design is what makes these buildings both strong and remarkably material-efficient.
The three structural layers
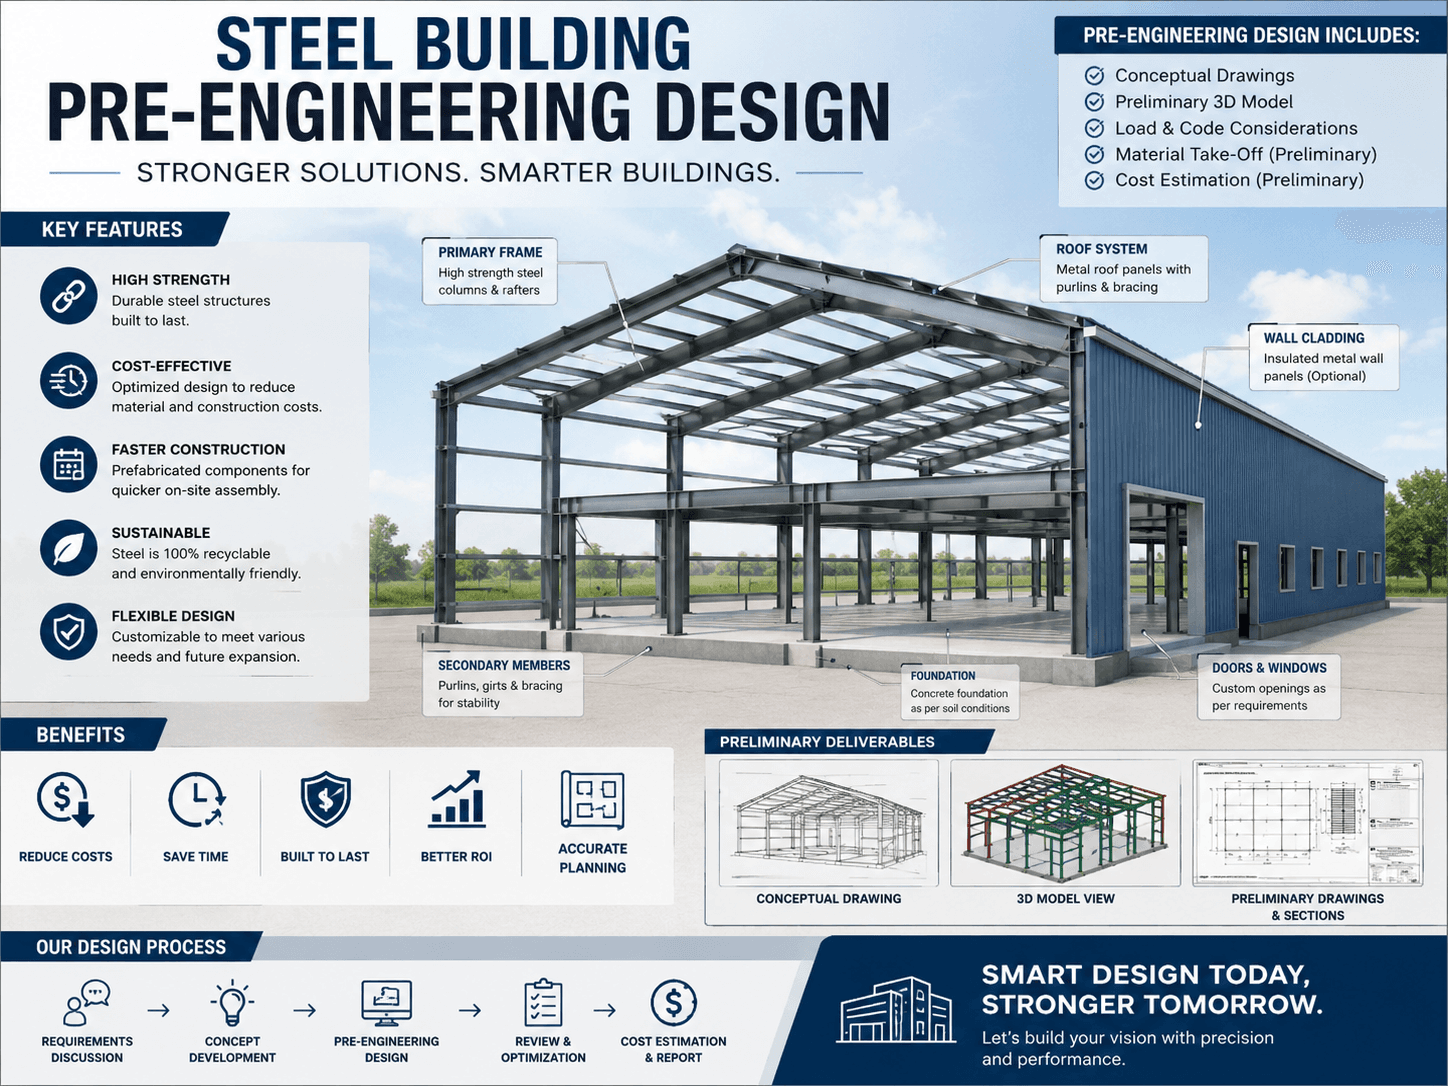
Almost every PEMB is built from three layers that work together.
Primary framing is the structural backbone — the main columns and rafters, usually tapered I-sections that are deeper where loads are highest and lighter where they aren't. This variable geometry is a big reason steel buildings can be both efficient and enormous. The primary frames carry the building's weight and transfer roof, snow, wind, and seismic loads straight down to the foundation.
Secondary framing is the cold-formed steel that connects and braces the primary frames: purlins span between rafters to support the roof panels, girts run along the walls to support wall panels, and eave struts sit at the junction of wall and roof. Secondary members also distribute environmental loads back into the primary frames.
The envelope is the roof and wall panels — typically corrugated steel (often 26-gauge) with high-performance coatings. Beyond weatherproofing, the panels contribute to the building's diaphragm strength, and insulated panel options handle thermal performance.
Frame types and when to use them
Choosing the frame configuration is the single most consequential design decision, because it drives clear-span capability, roof shape, and cost.
| Frame type | Best for | Notes |
|---|---|---|
| Clear span (rigid) | Open interiors — arenas, hangars, riding rings, warehouses | No interior columns; most usable space; higher cost per foot for wide spans |
| Multi-span | Very wide buildings — factories, big-box, large warehouses | Interior columns reduce steel weight and cost on wide footprints |
| Single slope | Lean-tos, add-ons, retail, drainage to one side | One-directional roof pitch |
| Lean-to | Attachments to an existing building | Must be supported by the structure it attaches to |
| Gable (symmetrical / unsymmetrical) | General commercial and industrial | Most common; symmetrical is the default |
A key sub-choice within rigid frames is tapered vs. straight columns. Tapered frames are typically used for column-free spans roughly 40–250 ft, while straight rigid columns maximize usable interior wall space and are available up to large widths. The right pick depends on how the interior will be used.
Bracing: the part people forget
Primary frames handle vertical and in-plane loads, but a building also has to resist longitudinal forces — wind pushing on the endwalls, seismic motion, crane thrust. That's the job of bracing, and it's required in every PEMB.
The most common system is rod (X-) bracing, a tension-only system placed in the roof and walls between frames to carry longitudinal loads to the foundation. Where a door or opening would interfere with diagonal rods, designers substitute a portal frame instead. Other options include flange and diaphragm bracing. Skipping or under-designing bracing is one of the more common ways a cheap design gets into trouble.
Designing for loads
A PEMB is engineered for the exact loads at your site, not a generic spec. The structural design accounts for:
- Dead load — the permanent weight of the building itself.
- Live load — temporary loads like maintenance or equipment.
- Snow load — driven by your geographic location and roof geometry.
- Wind load — governed by exposure and regional wind speed.
- Seismic load — based on local seismic hazard.
- Collateral / special loads — sprinklers, ductwork, cranes, mezzanines, solar.
In Ontario, design follows the National Building Code (NBCC, as adopted provincially), and snow loads vary dramatically by region — from lighter loads in the southwest near Windsor to much heavier loads in Northern Ontario. Heavier snow means more steel in the frames, so two identical-looking buildings can have very different engineering depending on where they're built. This is exactly why design has to be tied to a specific address and intended use.
Dimensions: what's possible
Pre-engineered systems are flexible, but a few practical ranges are worth knowing during design:
- Clear span width: standard single-span rigid frames commonly reach up to ~150 ft without interior columns; custom engineering can push clear spans toward 300 ft.
- Eave height: roughly 10 ft for basic storage up to ~30 ft for most commercial uses, with custom frames reaching 40 ft+ for hangars and tall industrial buildings.
- Bay spacing: typically 20–25 ft (the distance between frames), which is the most cost-effective range for standard purlins.
- Length: essentially unlimited — you add bays indefinitely.
A useful design instinct: wider clear spans and taller eaves both add cost quickly, so it's worth confirming you actually need them rather than over-speccing.
The design and engineering workflow
A typical PEMB design process runs roughly like this:
- Define the program — use, dimensions, eave height, clear-span needs, and openings.
- Establish loads — pull the governing snow, wind, and seismic values for the site and code.
- Select the frame system — clear span vs. multi-span, gable vs. single slope, tapered vs. straight.
- Engineer primary and secondary members — size frames, purlins, girts, and bracing for the loads.
- Lay out the envelope and openings — panels, insulation, doors, windows, and any framed openings.
- Produce stamped drawings — sealed engineering and erection drawings for permitting and assembly.
- Coordinate the foundation — anchor bolt layout and reactions for the concrete design.
Modern design software ties this together: change a door, the roof pitch, or a bay, and the material list and framing logic update automatically — which is a big part of why these buildings can be customized so quickly.
Designing for openings and future flexibility
Every overhead door, window, and man-door has to be engineered and framed, and each opening affects the surrounding members and bracing. Good design plans openings up front rather than cutting them in later. The same goes for future-proofing: if you might add a mezzanine, a crane, a lean-to, or solar later, it's far cheaper to engineer the frames for those loads now than to retrofit a building that wasn't designed for them.
A quick design checklist
Before you finalize a design, confirm you've nailed down:
- Intended use and any process/equipment loads
- Exact site location (for snow, wind, seismic)
- Clear span vs. interior columns
- Eave height and roof pitch/style
- Number, size, and placement of openings
- Insulation and envelope performance targets
- Future additions (mezzanine, crane, expansion, solar)
- Foundation coordination and anchor layout
Frequently asked questions
Why are tapered frames cheaper than straight ones for wide spans? Tapered I-sections put steel only where the load demands it — deeper at high-stress points, lighter elsewhere — so they use less material to span the same width. Straight columns trade a bit of that efficiency for cleaner, fully usable interior walls.
Do I need bracing if my building is small? Yes. Bracing resists longitudinal wind and seismic forces and is required in every pre-engineered system, regardless of size. The form it takes (rod bracing vs. portal frames) can change based on your openings.
Can the design be changed after fabrication? Changes are easy and cheap during design and expensive after fabrication, since members are pre-cut and pre-punched to the engineered drawings. Lock in openings, heights, and loads before fabrication.
Is a clear span always better? Not necessarily. Clear span maximizes open space but costs more per foot at wide widths. If interior columns won't interfere with how you use the space, a multi-span frame can save significant steel and money.
Design your steel building
To get a design tailored to your project, have your intended use, approximate dimensions, eave height, clear-span needs, opening requirements, and site location ready — then request a project-specific design and quote.
This guide explains general pre-engineered steel building design principles and is not engineering advice. Every building must be designed and sealed by a qualified structural engineer for its exact site, loads, and governing building code.